Showing posts with label Spring. Show all posts

Saturday, April 13, 2013

A Hard Lesson to Learn

This past month I learned a hard lesson. DON'T EVER FORGET YOUR CAMERA!

My friend, who recently had a baby, threw a wonderful baby shower. Of course, I insisted on bringing the cake! I stayed up all night making a gorgeous shower cake, complete with baby-pink-zebera stripes inside! I was thrilled with the final product and brought it to my friend's house, set it up and went for my camera.... not there.
I checked in my car, not there either....
I looked again in my supply bag.... not there.

Realizing I had made the most horrid mistake of forgetting my camera at a baby shower (where I still had not taken a photo of the cake), I began to ask around for a camera. Surely someone would have brought one. NOPE! The proud momma didn't... the proud papa didn't, and neither did the new grandma. WHAT IS GOING ON?!

In a panic, I began to wonder what to do. My only option was to find a camera. One of my friend's friends (who traveled from Winnipeg) offered hers, and I proceeded to take many lovely photos of the various parts of the cake, making sure to check balance and colour... her camera was awesome! Long story short, she never sent me the pictures.

In a scramble, my friend and I were able to come up with a few photos. I got lucky! Let that be a lesson to me! Don't forget your camera!!!!
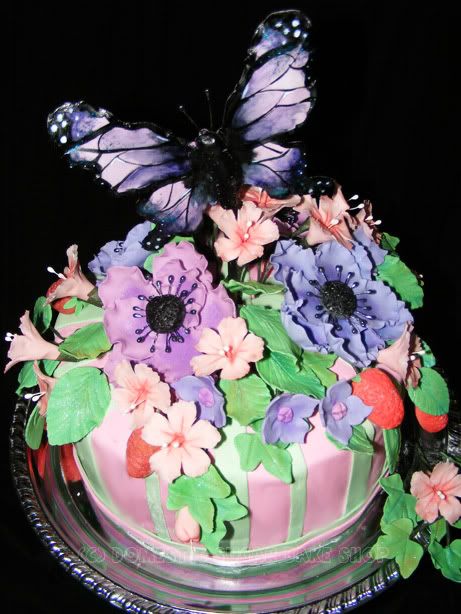
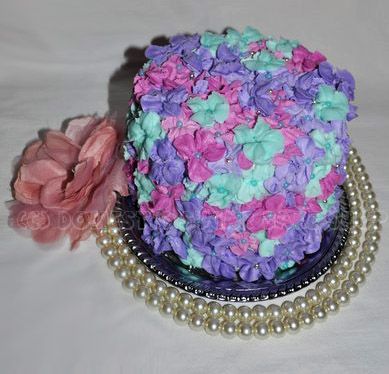
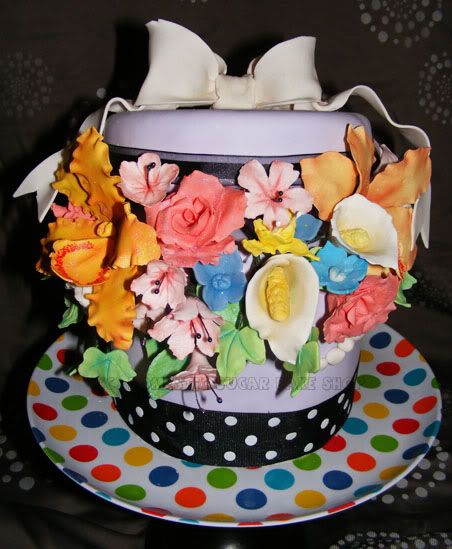
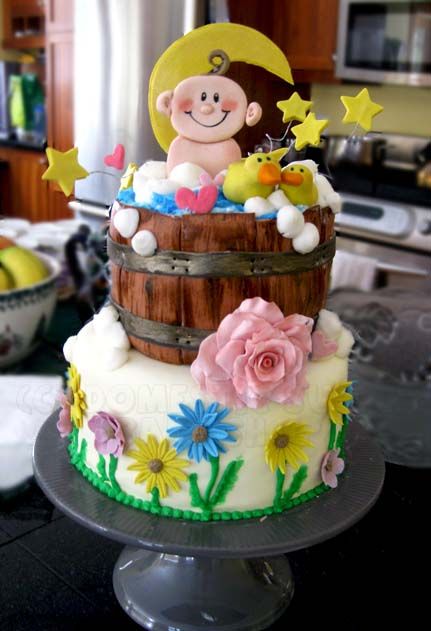
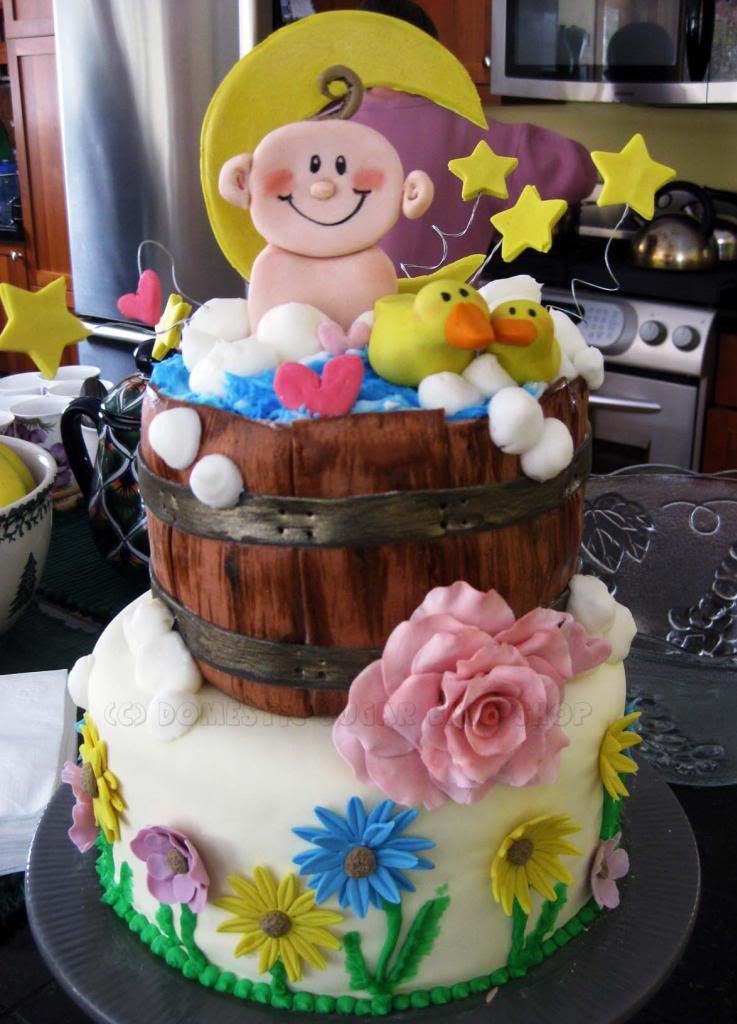
So the cake:
Vanilla Fluff cake with pink-zebra patterned insides and pink vanilla buttercream. 


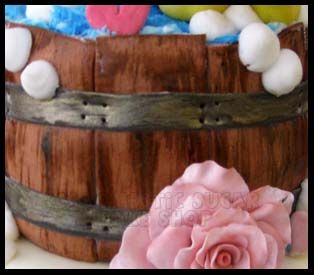
Though it is not the best photo, the barrel for the baby bath was awesome! I individually cut each 'panel' of the barrel and pock-marked the fondant , then brushed on the wood grain. I added a strip of black fondant, then added in the 'screws'. This photo, of course, does not do it justice!


And of course, the baby in the bath is playing with her duckies. The water was awesome! stiff buttercream to make it look like moving bath water, and buttercream bubbles!


I now know that I need to be more cautious in the future! I am more upset that I got no good photos of baby Bea, who slept on my lap the entire shower!


post signature

Sunday, December 2, 2012

A Sugar FLower Spread

HUZZAH! Baking in my new home has been wonderful!

In my last post, I showed you some pretty sugar cherry blossoms I had been working on...


Well, those flowers went to a cake I was making... One for my grandmother's 90th birthday party. The party was held in my home town, four hours away, so I had a lot of transportation woes... but ultimately, the cake turned out okay, for not having all my tools and tricks available.


Since I had to do a four hour commute for the celebration (YAY, grandma is totally worth it), I decided to pre-bake all cakes and cupcakes (a total of 90 of them), at home, then transport them and assemble everything at the church. Luckily for me the church had a lot of items at my disposal, and the ladies were super nice in helping me find all my gear. I had so many people watching me put it all together, which was funny, but I enjoyed it :) I don't usually get people interested in my caking.. my husband certainly finds it boring.  


I did all the sugar flowers at home too... I made two large stargazer lilies, one orchid, several cherry blossoms and about 30 blue flowers (bluebells?)... which are so tiny they just act as filler. The cake was gorgeous! As I have said before, my camera is no-go until my computer is up, but luckily my aunt had hers!


So, with only a few cupcakes at a time, we decorated the table.... The whole room was filled with cupcake-style decorations... including cupcake confetti!!! I ABSOLUTELY had so much fun running around with confetti screaming SPARKLE SPARKLE!!! My husband, who is used to such outbursts, just laughed, while my family looked a little confused... SPARKLES ARE AWESOME!!


 My next thing to do on my list is to put up my Christmas tree and to make my house all sparkly! I am guessing that will wait until next week, as my tummy is a little unhappy at the moment. Still, it was a great weekend!
Cheers all!
post signature

Saturday, September 22, 2012

Choot 'em BILL!!

In Northwestern Ontario, people always try to pass the time away... waiting and hoping for the fall; impatiently hoping to 'choot something! It never ceases to amaze me how this town lights up around this time of year. Children, parent, and families all move from their small town rural homes, and push into the bush to find something to 'choot.

This week, I finally got a chance to make a cake for a hunter! Bill turned 40 this week! His family often encourage him with the wondrous red-necked words "'choot 'em!" Sadly, we have no gaters here up north, but the magic of "Swamp People" has certainly not missed it's mark on our population, so we turn to the deer to live out our dreams! BECAUSE THEY ARE DELICIOUS!!!


Here is Bill:


And here is his reason to want to 'choot anything:


HEY, LOOK OVER THERE!! THE BIG 4-0 IS HIDING BEHIND THOSE BUSHES!!!


But seriously, this cake is a simple homage to aging hunters everywhere..... and while I forgot to paint the sugarpaste Bill's neck red (forgot, but wanted to), this cake represents the best of my hunting knowledge.... I had to Google Deer (I usually only eat them, not 'choot 'em), and My gun looks like a rocket launcher.


So next time you come down to Northern Ontario, look out for the bearded man with the rocket launcher, 'chooting deer in an attempt to dodge fate. Don't worry, around here, you're never too old to own a gun hunt!

post signature

Monday, August 13, 2012

Tutorial: Butterfly Cake Topper

 Hey! Me again!

For my cakes, I like to add small details which add height and sparkle, so my Sugar Butterflies have become a hit! Here's a tutorial on how to make your own Sugar Butterflies:


As in all my tutorials, I try to keep the materials simple. In the tutorial I use a ball tool and a foam mat to ruffle the edges of my butterfly; you can skip this step and just do a flat butterfly! As always, work with what you have! You can substitute the ball tool for a toothpick and  roll the edges of the toothpick on the butterfly's wings.....

What you need:


  1. Sugarpaste/Gumpaste
  2. Butterfly Cookie Cutter
  3. Rolling Pin
  4. Ball tool (optional)
  5. Foam Mat (optional)
  6. Dowel
  7. Food Color (gel kind like Americolor)
  8. Water
  9. Paintbrush


Step 1:


Roll out the gumpaste. You will want it to be fairly thin, maybe 2mm thick or so. Using your favorite butterfly cutter,  cut out the shape of the butterfly.

Step 2:


Using a ball tool, thin out the edges of your butterfly's wings to give the wings that whimsical look. I try to spread the butterfly's wings, and leave the body thick. This will be important when you dowel your butterfly.


As you can see, the spread butterfly is larger than the cutter. This is important! Your butterfly should be wider and longer than the original cut out for when you have to put the backing on him.

Step 3:


Now, take your thin dowel and lay it down the center of the butterfly's body on the underside. Allow the butterflies to dry in this way (Overnight, or 8hours)

Step 4:


When your butterfly is nice and hard, carefully remove him and put it upside down. Roll our another butterfly to be the backing. To secure him, simply add a little water to the backside of your butterfly, then apply. Again, allow time to dry. I try to make sure the 'head' of the butterfly is sealed well, and make sure the dowel does not poke through the top of the piece. By creating a dome on the top, the stick will have something more to keep it in place.

Antenna: At this time, you can choose to place antenna into the butterfly. Simply use a floral stamen (optional, found at a craft store) in the top between the two layers. When it dries, they will be secure.

Step 5:


Now for the sun part: DECORATING! Taking your gel paste food color, water it down, and paint the edges and body of the butterfly. Keep in mind that the as the butterfly dries, the shininess of the 'paint' will dull. No worries!

Step 6:


Depending on your pattern, you can paint the inside any way you wish. For this one, I decided to make a Monarch butterfly, so I painted the 'cell' veins through the body. Once the black is done, allow time to dry (10 min?).

Step 7:


Now, when the black color is dry (this is tacky, as you can see), paint in the color. You can choose to fill all the cells, or just one or two for a stained-glass look. The Flower Garden Cake had purple gumpaste with a few cells painted.

Step 8:


Add a contrasting colour to the edges of the butterfly....


Blend the colors together with a clean, lightly dampened paintbrush. You can add in the darker black if you wish by swishing it with the paintbrush.

Step 9:


Allow time for the fully coloured butterfly to dry. If you wish, you can paint the stick the colour of the cake (for instance, I have painted them black/white before). You can even add stripes or polka-dots to the stick to give them character.


Here are the to I used on Linda's Pink Wedding Cake.


Now You too can make Butterflies! HURRAY!

post signature

Thursday, May 31, 2012

Cheeky-Tulips

I am pretty sure that aside from my family and close friends, many don't know that my home town of Thunder Bay had massive flooding. The big storm overflowed rivers and streams, overloaded the water treatment plants that then backed up into people's homes. People fought tooth-and-nail to keep water out of their homes, while others could do nothing but watch as 2 meters of water flooded their basements (that is way over my head). Some even said they had live fish down in the depths of the murky water.


While our region has been dry, this water does not help at all. I suppose we're all just wanting May showers to lead to June flowers, which is why I've made these cookies. I kept thinking of flowers, and people, rain and being stuck in the house. So, in conjunction with a cake project I'm working on, I threw together some cookies. What better to lift the spirits? (Just so we are clear, my family was fine... I'm sure my father was canoeing down the swollen rivers, and maybe even in the back lane).


 I think these cookies helped me to kick myself out of my funk! It was almost 3 weeks between my last post and the Thomas cake I made. I hate when you're creative juices dry up! Unlike the weather


Badum-CHING!


And I love to paint on cookies. I remember someone saying that using food-doodle food writers (edible markers) was cheating, but I consider painting on a cookie to be quite beautiful. I can get more detail into the cookie this way. And I make them pretty.


So, here's to spring, and summer, and nice weather, and fewer rainy days.
And good luck to all those in the Flood Zones!

I am off to finish my cake project... and maybe go to work!

post signature

Wednesday, April 25, 2012

Flower Bouquet Cake

Hurray! SPRING!
I've been watching the weather change. WE OFFICIALLY HAVE GREEN BUDS ON OUR TREES! That is super exciting. Today I was even fantasizing about swimming in Rainy Lake. I remember last year in May taking a plunge in freezing water when there was still ice moving out. This year, the ice is long gone after that wonderful March weather, but it is still far too cold to go for a dip just yet. If you've seen my polar plunge photos, you know that the cold does not bother me. Luckily, the flowers are blooming again, so here's my latest cake creation:


A friend of mine celebrated her birthday in April, along with a bunch of her co-workers. She asked me if I would not mind doing a communal cake to celebrate the four birthdays they shared this month. Since I was only given short notice, I make something quick with buttercream. I've been dieing to try out the flower tip I have, and since most of my work is done in Fondant, this was a welcome change.


I particularly like the little flower centers. I used some non-perils I ordered from Bake it Pretty. Super sweet. I think they finish it all off.


This week the photos were taken by myself, and my friend Caren, who, along wither her super awesome camera, came to play with light and colour. We sat on the floor with our little lighting set-up and played with flowers, scarves, blankets and everything else we could for the setting. Honestly, I was in love with her camera. I guess after 5 years, it is time to get a new one... I love my little Fuji Finepix, but Caren's camera was soooo awesome ლ(இ益இლ

post signature

Wednesday, March 14, 2012

Flowers are Blooming

The wonderful weather continues! Actually, it rained a little here on Monday, but the sun came out and the rest of the week looks clear and warm! You can even see the buds on the trees starting to come out. We've had a very mild winter. Especially for Northern Canada!

This cake is my finest! I truly believe that this cake represents my best work. My friend's daughter was celebrating her 10th birthday, which was also her "Flower Birthday". How excited was I when I was asked to make the girl's cake.

Of course, this cake in my opinion in whimsical. The only request my friend had was "Lots of Colour," and beyond that, she said go to town. This design is a very classic design. It is known as a "Flower Box" Cake. It is a "Hat Box" cake with flowers spilling over the sides and the lid slightly a-kilter. I made sugar flowers for three days! Orchids, roses, hydrangeas, cherry blossoms, calla-lilies, and ivy leaves.

The sugar orchid below is my absolute favorite flower. I have never made a combined flower (that is flower petals wrapped together to make a flower). Most of my tries result in very broken flower pieces. This time, I was able to make two, one for each side, and they looked fabulous!


I think the best part was the party. I taught the kids how to decorate cupcakes. I used piping bags and we did Cuppy bears. I was super excited. They got creative and made Cuppy-Ducks and bunnies and kitties too! The kids did a fabulous job, and hopefully I'll get the pictures of the decorating fun from my friend. My course at the college, which runs April 4th, is full. I am so excited! This was a great run-through!

Well, I have one last cake for this March Break. I have yet to make it.... So many birthday parties, so many cakes! I am having a super fantastic March Break. I hope you are too!

post signature

Sunday, January 29, 2012

I love you a Latte

While these cookies were originally for a sick friend (one whom enjoys going for lattes with me), I couldn't help put think the theme was a little reminiscent of Valentine's day, which is quickly approaching.

The title: "I love you a Latte" is another one of those dorky things Hubbie and I say to one another. The response to the comment is always "I love you amore" which I guess drives home the fact that I am completely dorky in every aspect, and I am officially "ONE OF THOSE MARRIED PEOPLE." YUCK!


Anyway, the theme was of hope. Of course, beautiful monarchs and lattes seems a strange choice for hope, but friendships, like any type of love, are formed through a gathering. To be metaphorical, the Latte cookies symbolize a gathering, as coffee trips are wont to do, and the butterflies symbolize overcoming, rising above (in this case, sickess). Seeing as my friend is neither wanting or ready for metaphors, I figure posting here might explain my dorky choice.

Oh look... there's another ENGLISH MAJOR... with her useless degree flaunting bad spelling mistakes and internet journaling. Isn't she special. (-___-);

Back to cookies. This design is perfect in my opinion for Valentine's day as well. The Latte cup is not a cookie cutter I own, but a hybrid: CUPCAKE cutter with SQUARE cutter on the bottom = LATTE CUP cutter. HURRAY! I think finding new uses for old cutters makes my budget a little happier. Why not find another use?

And what about these butterflies? This is my absolute favorite 'pretty' cutter. Even the normal cutter looks nice. I got it online, and have used it many times. This time, I used it for the monarch butterfly: Outline the black and fill it in!

I actually think the colours of the Monarch are absolutely stunning! I also love the Monarch's story... how it flies to South America every winter, and only it's children will return. How does it know to do that?! What sort of amazing evolutionary mechanism tells it to do that... I still can't train my husband to make coffee. "THANK YOU!"

Mine is better anyway (╤ ╤)♥


So, here's to pretty cookies, friendship and love. Hopefully I will have some more classy analysis to blither about.
Until then!

post signature