This cake was super fun to make. Despite my reservations about making it, and despite the fact that it took oodles of cake to actually produce, I had a blast making it.
Wonder how it all came together, or want to know how to make a Barbie Cake yourself? Here's a sneak-peak on the making-of Barbie Cakes (Made in buttercream).
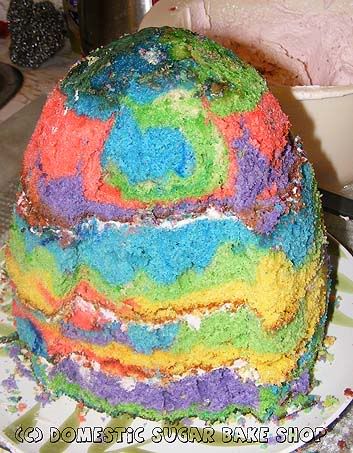
 First thing to do is to stack your cakes. For the height of a regular Barbie-doll, I used three 9 inch cakes and one 6 inch cake for the top (which I let slightly dome in the center). Ice the in-betweens of each cake and stack. WARNING! MAKE SURE TO CUT OUT THE HOLES IN THE CAKE FOR BARBIE'S BODY. YOU CANNOT SIMPLY STICK HER IN AS IT WILL CRACK THE CAKE. To do this, simply use a round cookie cutter and cut out holes in the direct center of each cake progressing up to the top layer. (not shown)
Allow them time to settle a little, about 1 hour.Carve into the shape of the dress. For this particular cake, I decided to do a ball-gown style with a RECESSED center panel. To do that I cut into the cake and then slowly carved out each cake block until I had a nice little pocket in the dress. You can't see it well until the next picture...
 There we go! Now, Dirty ice the cake (making sure the icing is as smooth as possible and place in the fridge. The cake will continue to set and it will also harden the icing on the outside.
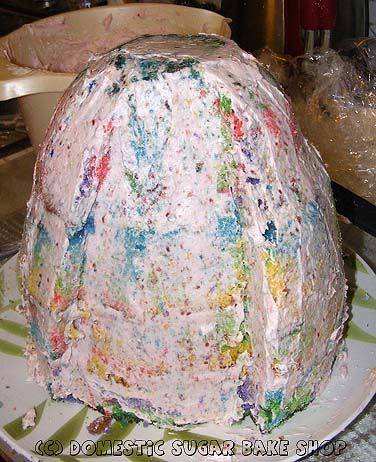 While waiting for the cake to chill and relax, you can go on to your Barbie doll. For this part, I used a little bit of Fondant. I just cut out the shape of a top (front and back) and designed a simple design. Since this cake was made to match Barbie's lipstick (Pink/Black/White), I colour matched the fondant to compliment her face. So pretty!
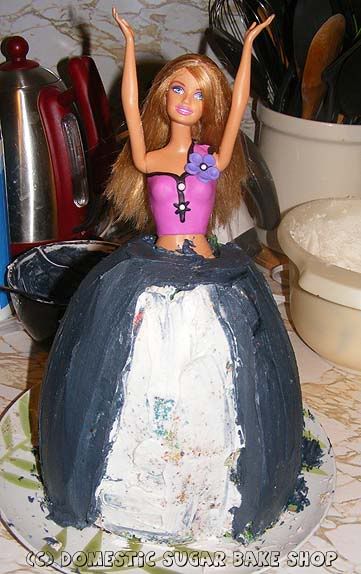
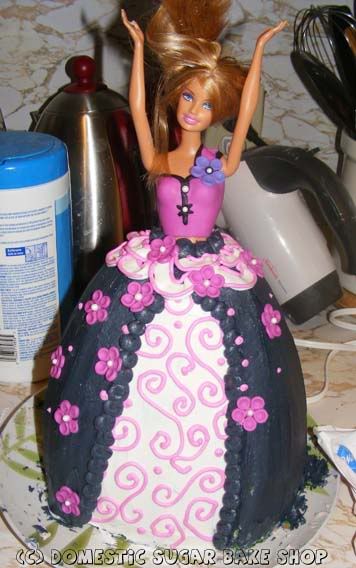
 Once you've got her all prettied up, it's time to actually ice the cake. To do this, make sure you have very smooth butter cream (do this by using whole milk or cream that is whipped). Choose your colours and begin the apply the buttercream. For this part, I used black on the outside of the dress. As you can see, the initial application is a little bit rough. That's okay! We'll work on that!
 Now, Place Barbie into the center of the cake and smooth the black icing around her, then decorate.
TIP: To smooth buttercream on a cake. Apply a coat of buttercream as smoothly as you can, then allow time for the buttercream to crust (10-20 minutes). When you can touch the buttercream without it sticking to your finger is when it should be about right to smooth. The easiest way to smooth the icing is to take a piece of parchment (about 20 centimeters in length and width) and apply it lightly to crusted buttercream. Then, taking your hand, lightly rub it over the buttercream. Do this all over the cake. This will push down and bumps into the soft buttercream underneath and give a nice smooth coat. If you have a fondant-smoother, all the better!
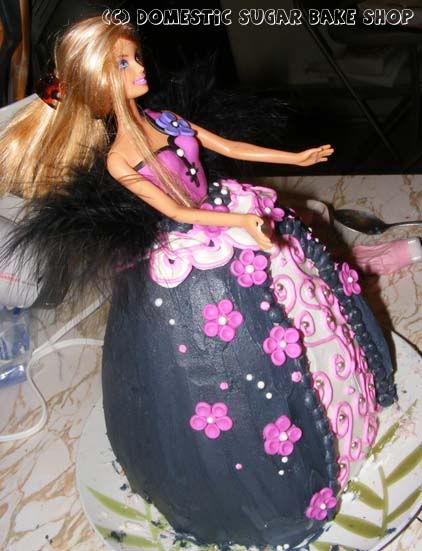
Before....
 AND AFTER!
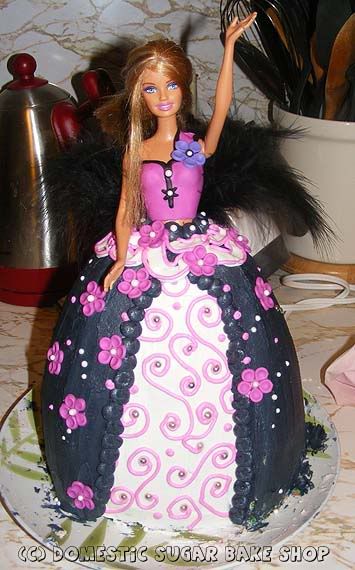
 Now, for this cake, I wanted Barbie to be walking down the catwalk, so I simply took 10 inch square pans and baked two cakes, cut them and filled them. Then, placing them side-by-side, I dirty iced, then iced them into a long rectangle. Next, I traced out the cat-walk on top, and placed the birthday girl's name and age on the end.
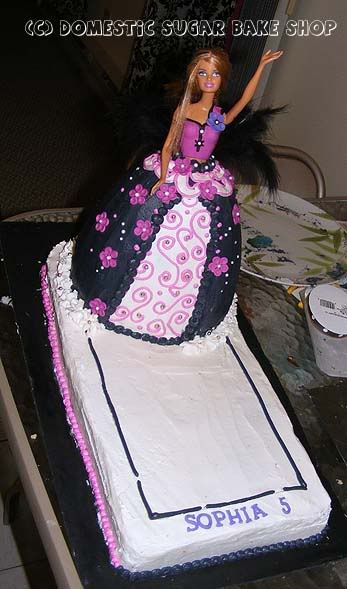 A catwalk is never complete until is has spotlights, and while they do not shine well in these photos, the two brown things sticking up from the cake are shining spot-lights on Barbie's walk down the walk. For this I used two key-chain lights and covered their casings with little fondant wrappers. You turn them on then cover them up! VOILÀ!
I hope that gives you some ideas on how to make the cake. Super fun! I hope you all had a great weekend like I did.
Until next time!

16 comments:
What a neat post! Thank you for sharing!
Wow! I am impressed at how well you made the cake. I never thought I could possibly make the cake but now that I've seen your tutorial....maybe i will give it a shot. Thanks for the posting the tutorial.
Great tutorial!And so thankful you shared that tip on cutting a hole in the cake to stick barbie in.I followed you from the foodie blog roll and I'd love to guide Foodista readers to your site. I hope you could add this cake decorating widget at the end of this post so we could add you in our list of food bloggers who blogged about different decorations for cakes,Thanks!
Love the barbie cake. I had one when I was a little girl and never forgot it.....Great job!
Wow you did great. Such a pretty cake.
I actually just did my first Barbie cake today too out of the Big Top Cupcake pan of all things. hah
I really like your design though.
Lovely...
Thanks for sharing.
Awesome!! I've always been a big fan of dolly cakes. I love the colours you used, it looks great.
That looks great! I think that one day I'll have to try it! Thanks for sharing all the tips, I love it!
http://lucyluvinyl.blogspot.com/
Wow! Just the cake alone is impressive :)
I'm stopping by with some happy news for you! Your blog has been nominated for the Best in Show award on my site!
Be sure to come vote when you get a chance and GOOD LUCK :)
I really like your version of Barbie cake - very bold and beautiful! I'll bet that was a happy 5th birthday for Sophia! Thank you for the tutorial.
Mary Ann www.rocknrecipes-rocknquilts.blogspot.com for old-fashioned family recipes
Truly a great cake. Thanks for sharing so much info. I might try this for my Barbie obsessed daughter's birthday this summer. She will be 21!
This cake is amazingly cute!! Thank you for linking to my K.I.S.S. blog bash this past week. I so appreciate you taking the time to share your wonderful ideas & recipes. Today is another blog bash, if you haven't already, please drop by & share more of your inspiring ideas!
Drop By The Tattered Tag
Wow, that is an amazing cake! You put so much detail into her dress--it looks beautiful! It reminded me of a barbie cake my roommate made for a friend in college . . . she said she'd never had one as a kid and always wanted one for her birthday, so she got one at age 20! I guess you never outgrow these ;-) Yours is fantastic!
Rachel @ Maybe Matilda
its a beautiful cake, i just loved it and my niece is sophia too so it seems i am looking at her birthday cake and barbie is her favorite too.. great post
Oh your cake is beyond adorable!
Thank you SO very much for linking up.
Have a gorgeous weekend.
That is a beautiful cake, I love to make cakes, work a lot with fondant, I am making a peacock cake for an auction tomorrow and will post the pictures tomorrow on my blog. Thank you for sharing how you made your barbie cake, I love it!
Have a wonderful weekend!
XXX Ido
Post a Comment