Thursday, December 30, 2010

My 10 for 2010

Well, Domestic Sugar has completed its first full year of blogging. Ah, the memories. This time of the year is one where people look back and reflect on all that they have done. In the spirit of blogging, I am posing up my 10 greatest hits of 2010.

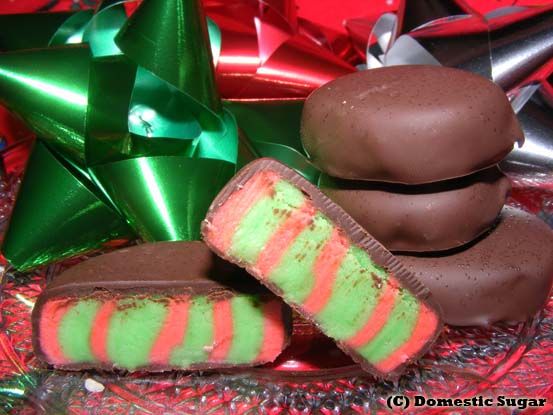
I believe this was more about the photos and the attempt than the success of the treat. What at hit these little cakepops were at the party. Thanks Bakerella!

Unique Ideas


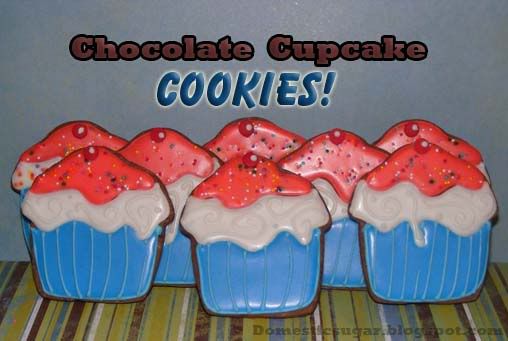
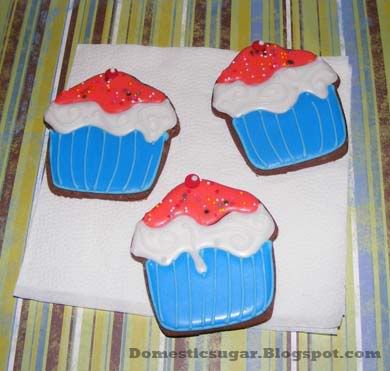
I love to try new recipes and play around. This recipe ended up being such a hit online as well as at home. Simple, fun, decorative. I'm pretty sure they were the cause of my seasonal weight gain. I have no regrets... yet.

Chocolaty Cupcakes

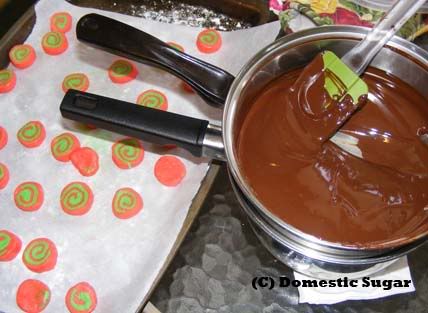
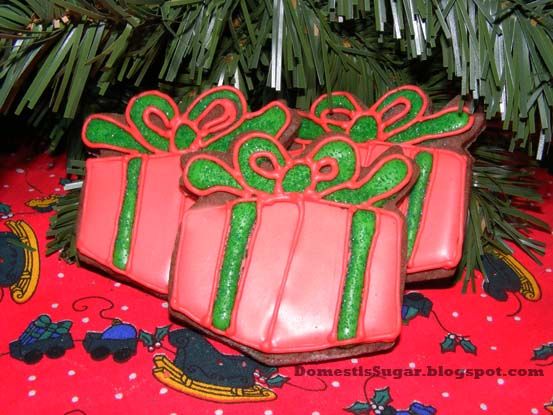
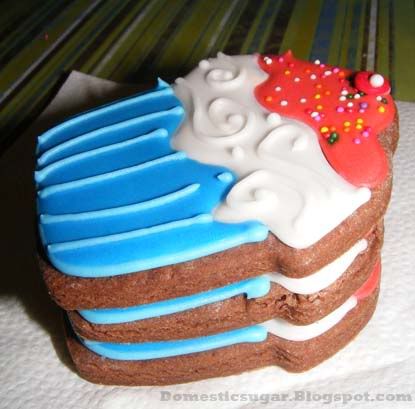
The king of chocolate cookie recipes. Roll outs... a super smash. Tasty. Someone asked why I chose to do the U.S Colors on the cookies (I'm a Canuck).

Apples grow on Trees

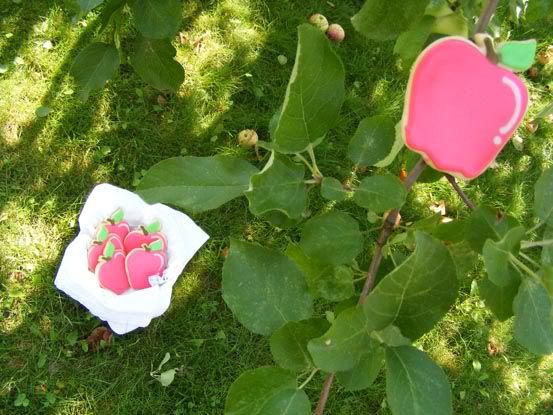
This is when I found out that photography can be fun. I had a blast arranging the cookies on trees and playing with them. It was such a wonderful day!

Bride and Grooms

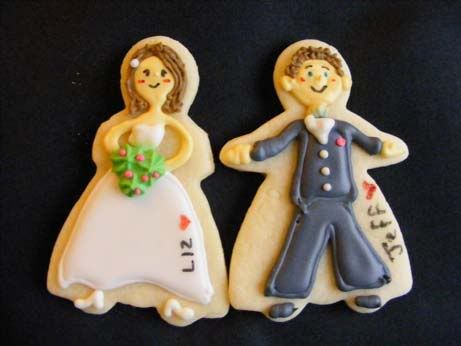
My first real wedding task. I was so happy with the way the bride turned out. Small details are so important... remember, don't try to use a 3 tip to pipe an outline (on the groom).

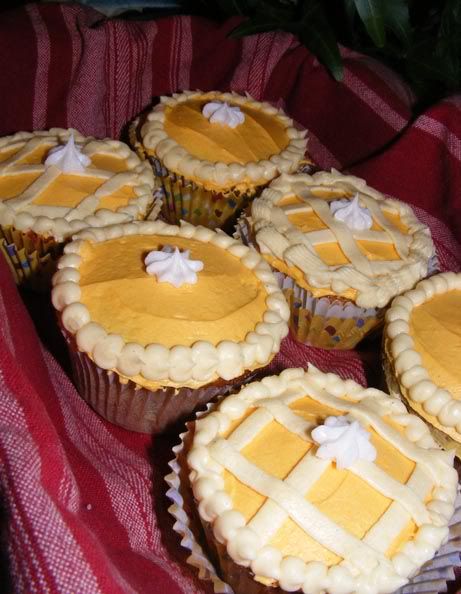
A huge hit as well. These little cuppies were featured on Cupcake takes the Cake. I was so excited. It was the first time I was featured!
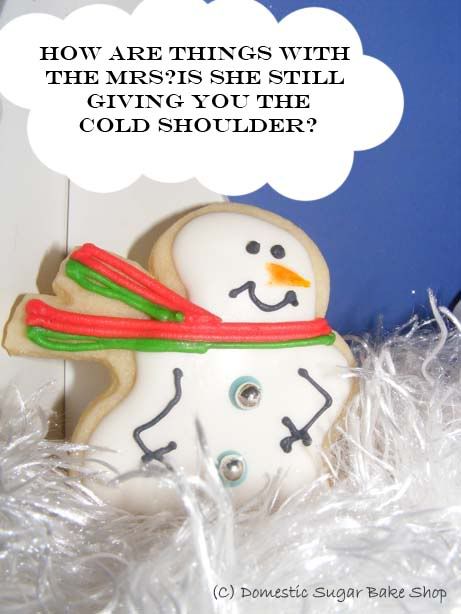
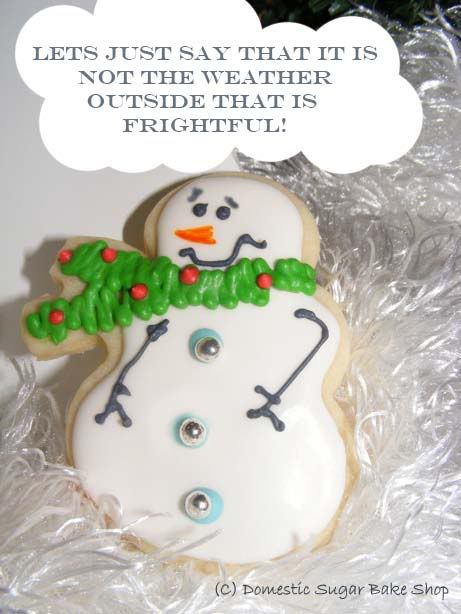
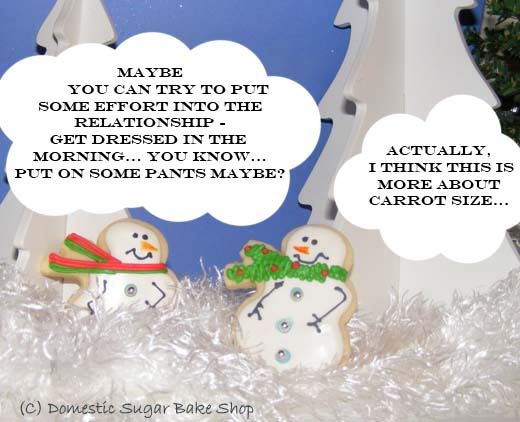
Bad Humor

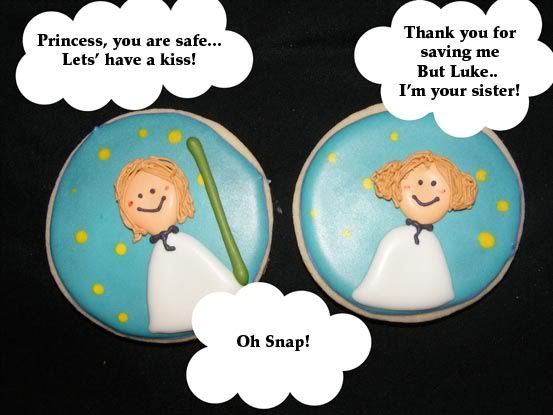
I may not be a good writer, but these cookies showed me how to have fun with my posts. I love the Star Wars cookie series. ... and I can laugh at myself, can't I?

Pretty Cheerleading Cakes

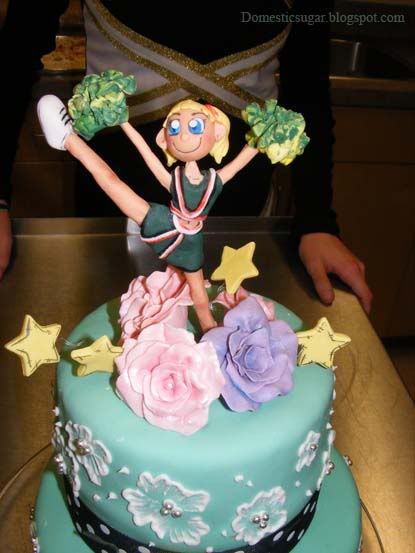
I made a lot of cakes this year (most didn't get posted because of tight deadlines and no photos). I am very happy that this one is here. I was very proud of the topper. I had a blast with gumpaste!

Bloody Brain Cupcakes

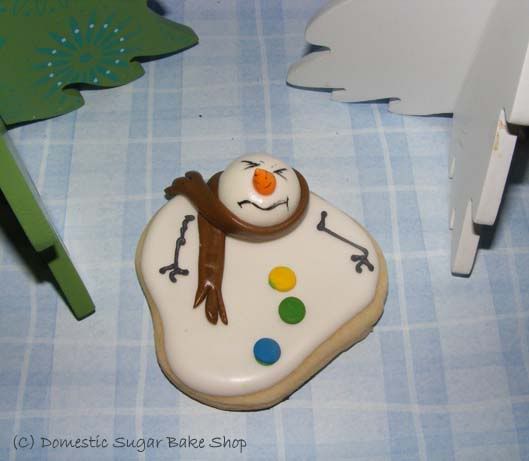
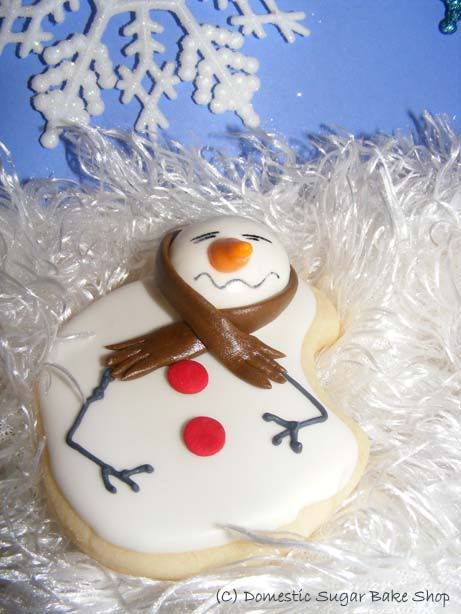
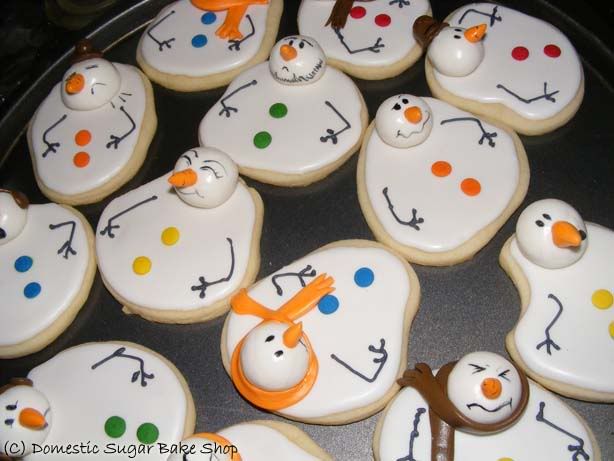
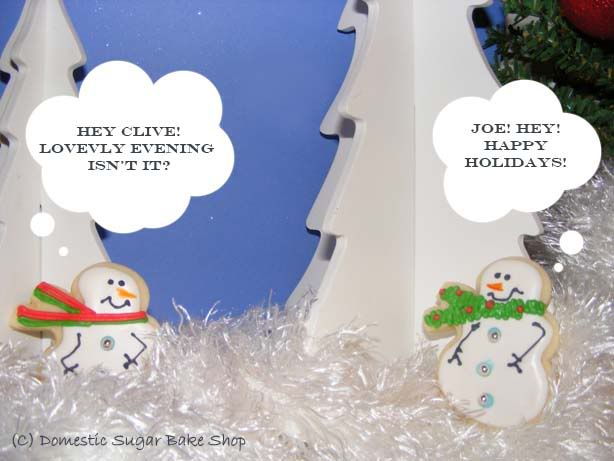
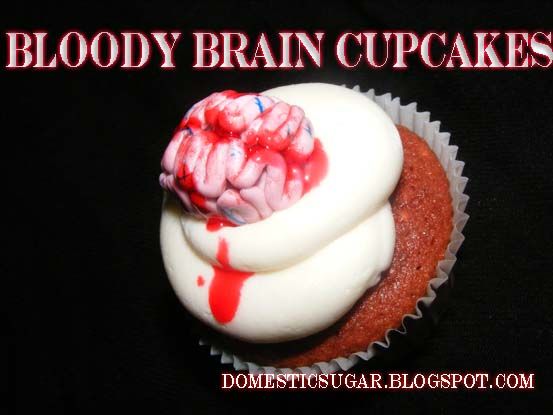
Another unexpected love! These are sooo cool! Considering my Zombie affinity, I love these. Check out the tutorial on the brains!

Grinchy Cookies

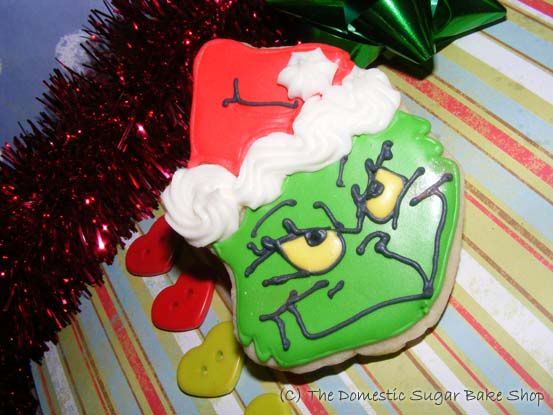
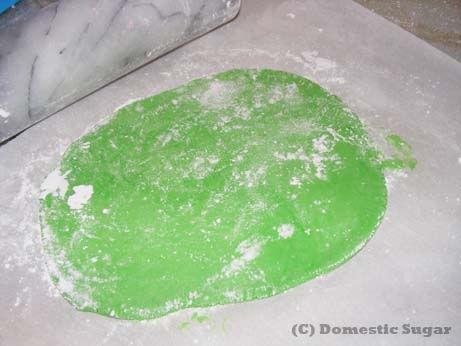
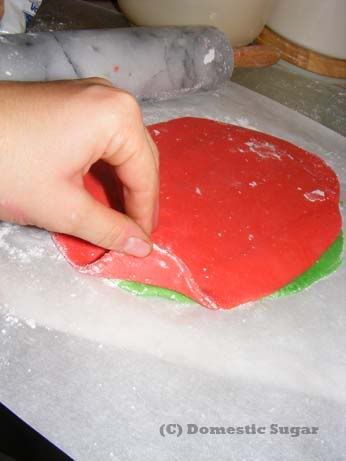
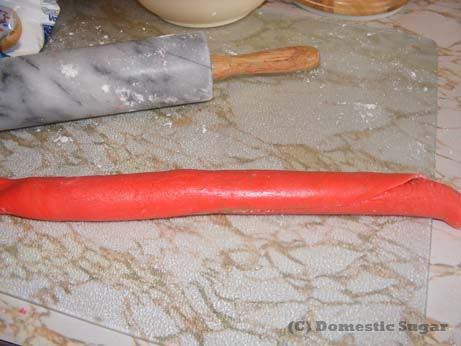
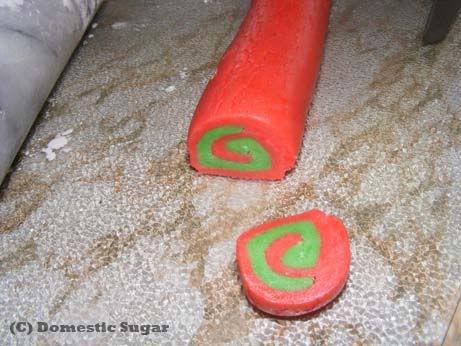
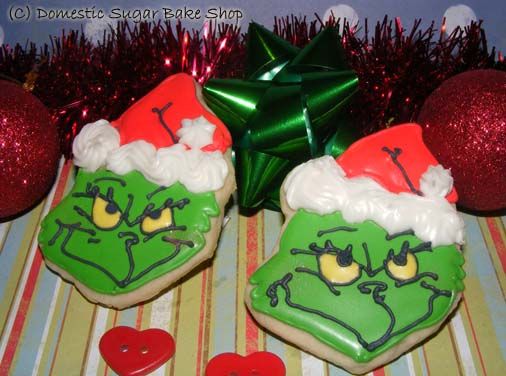
And, my Grinchy cookies. Great Googly Moogly did these freak me out! I had such a blast making them... I giggled the whole time!

So, what was your 10 for 10? Tell me, post your blog, or comment on the best memories you have of this past year. I wish you all a very happy new year. I'll see you back on the 1st with a new cake picture. Please be safe and responsible!

post signature

Monday, December 27, 2010

Gifts Abound

I hope all of you had a wonderful Christmas, full of family, food and fun. My break was very restful. Most days I got in excess of 18 hours of sleep, which may have come from the flu I contracted one day after arriving. But, all was not lost! After 5 days of being bed-ridden, I am now able to enjoy Post-X-Mas shopping, which means... MICHAELS! I bought myself some brand new fondant and gumpaste tools. So excited to get back into my own kitchen and bake! Since I did very little of that, my post may seem a little weak, but I wanted to share with you all my X-Mas baking.

So, each of the 30 people I was baking for got an assortment of goodies. I had about 40 dozen goodies baked by the end. The boxes or tins each contained an assortment of goodies. So much baking. I like to get my baking out early so that all the recipients can have baking ahead of everyone else. I get all my baking out 2 weeks into December at latest. When you work at a school, kids, parents and co-workers will load on the goodies in the last week of school, which can create quite the problem for poor teachers who are dieing to eat it. Don't get me wrong, you can send goodies with your kids, just know that just before the break, the teachers are sweetened out! Hence my plan!


I like to create an assortment of goodies. From Left to right:
1. Maple Snickerdoodles
2. Simple Snowflake sugar Cookies
3. Caramel Butter Bars
4. Scottish Shortbread
5. Chocolate Crinkles
6. Peppermint Patties


The best part is that you don't need to put in a lot of cookies for everyone. Smaller families cans share small cans. To be truthful, the Mint Patties and the Caramel Butter Bars were the two most popular things in my packages. And as always, people love the look and taste of my sugar cookies. I'll have to share the recipe with you all in the coming days. For now, I'm going to enjoy the next two days here in Thunder Bay, and will be home shortly to bake anew.

POLAR PLUNGE ON JANUARY 1ST!
MY BIRTHDAY ON THE 2ND!

PARTY HARD EVERYONE!

post signature

Thursday, December 23, 2010

Domestic Sugar ♥s Mr. Melty

A while back, Meaghan @ the Decorated Cookie posted a sad observation about her cookie creation, Mr. Melty. She noted that while the cookie design was unique, no one seemed to take to making or recreating it. She was wrong. There came an overwhelming swarm of re-posts, comments and adaptations of the famous idea. Meaghan, I'm one of the adoring fans! Here is my Mr. Melty Family!

This one was my favorite.

And my hubbie's favorite. He said he looked like he needed to go to the bathroom.

One unhappy but accepting Melty.

And there were many more. Some with Hats. Some with Earmuffs. Some with Scarves. Some without. One even spouted a Beard (that's my hubbie!).

So, Meaghan, you see that your idea is a big hit. And even here in the great north, people got a huge kick out of the idea. What a fabulous addition to any cookie platter. Show your love and support. Make Mr. Melties of your own! They are fun and Delicious!

post signature

Friday, December 17, 2010

Snowman Theater

Hey guys, just back with a little cookie post. I am not the funniest person, but I wondered, if snowmen had problems with snowwomen, what would it be about? Here's my thoughts:

( I just like the name Clive, it sounds very 20s'
YEAH! That's right, A TYPO!)


BADUM-CHING!

Finally on holiday break. Hope you all are enjoying your holidays (or pre-holidays)!

post signature

Monday, December 13, 2010

Grinch Cookies

The Cheerleading wind-up is coming. This Thursday I promised the guys that I'd bring some kind of special goodie and asked what they wanted me to make. Naturally, they asked for a cookie. So, well, okay, while I realize this will spoil the surprise for the girls, I could not wait to post this cookie design! I made what they asked for, Dr. Seuss' Grinch... IN COOKIE FORM!


One of the girls loves the Grinch so much, she wears a hat with his smirking face all year long. It's beautiful!

I have to admit, free-handing these cookies proved to be a bit of a challenge. First, I cut out a picture of the Grinch's head, then I baked the cookie and began to decorate by first outlining the face in green, flooding it, then painting on the smirk. I realize that normally you'd start with the base layers (green and blue in this case) then add the detail, but I was simply too excited to do that. I just had to make his face. You can't really tell but I brushed pink luster-dust on the cheeks. I guess my Royal Icing is a bit too smooth to pick it up though. :)

While not all the smirks equally looked devilish, my husband came home today and said, "OH WOW, IT'S THE GRINCH!", so I knew beyond a doubt that I must have done this right. I wish I had a KopyCake... if anyone feels philanthropic and wishes to send me some cheer for Christmas, please feel free to contact me. :)

P.S - Did I mention that it is currently -28 degrees C outside? Good thing my oven was on! I might have frozen. SNAPS TO BAKING COOKIES DURING WINTER!

post signature

Thursday, December 9, 2010

Simple Snowflake Cookie

CHANGE OF LOOK! SNOW! We now have some 4 feet of it... it's so much snow!

It's Christmas Baking time... that takes a lot of work. It's difficult coming up with so many beautiful desserts to make a fun tray. And each year, I make about 30 trays of goodies to give out. One of my fall back desserts is the sugar cookie. They were my first love and continue to be a big hit among co-workers. For my baking trays, I wanted to include some decorated sugar cookies, but did not have time to make some 100+ cookies that were decorated (I usually include about 7 types of baking and had about 3 days to make it all).

Snowflake Cookies are a great alternate 'pretty' choice. You can do a lot with a small design. I made each snowflake different. After piping on a few lines, the cookies looked fab. I choose light-blue. Then, some silver or white non-perils, and some sanding sugar and, voilà! Instant beauty!


I like the idea of having at least one shiny choice. Not surprisingly, these and the Chocolate mints were the top choices, followed by the Caramel Butter Bars. I'll have to show you the set-up a little later on. In the meantime, enjoy your holiday baking!

post signature

Monday, December 6, 2010

Homemade Mint Patties!

Have you ever had a York Peppermint Pattie, or any peppermint pattie for that matter? Do you know how icy cool they feel, and how they melt in your mouth so good!? Well, I've been dieing to try this recipe for some time now. I'm super happy to share it with you! This is recipe is only a part of the Christmas Baking I've begun. I've got many more favorites to show you over the next couple of weeks, so keep with me on this one.

The peppermint Patty! Wanna know how to make it?

In A bowl, combine the following ingredients:

- 2 1/4 c powdered sugar
- 2 tbsp light corn syrup
- 2 tbsp (you may also need some extra) water
- 1 tsp peppermint extract
- you may want about a tbsp of shortening to keep it from sticking to the rolling pin.

The ingredients should start to ball together, when they are just starting to form into a dough ball, take the ball out and kneed it a little to ensure full incorporation (you may need more water at this point). You do not want to put too much more icing sugar into the dough or it will be too thick and not as melty when eaten.

While kneading it, you can add colour to the dough. I separated into two colours, green and red for Christmas.

CAUTION! The dough is very sticky! You will need to use lots of Powdered/Icing sugar to keep it from sticking to the surface of your counter. Just take a deep breath, and work with a dough scraper.

GREEN!


Once you have your dough is good to go, begin rolling it out between parchment sheets. Again, it will be quite sticky. You can also use a little shortening to prevent the sticking.

Either roll out the single colour, or layer then roll up the two colour doughs to make the swirl. Here, I layered Red and Green.

All coiled up...


Cut the roll in 1/2 inch increments. The dough will sag, and you may need to slightly reform it as you go along. It's quite easy!

Now, take the mint insides and freeze for about 10 minutes or so. While they freeze, temper 300 grams of fine quality chocolate - I like 70% Cocoa. Over a double boiler, heat 200g of the chocolate to 80 degrees, remove from heat, place remaining 100g of chocolate, stir until incorporated and melted, then return the chocolate to the double boiler and heat to 88 degrees (on your chocolate thermometer). This is a science! It can be tricky. Don't feel too bad, just do your best! ( I just misspelled chocolate 3 times in this sentences - OH MY! Thank you spell check!)

Now, dip each mint piece into the choco. I use a fork and just tap them in and out, then use a toothpick to remove the chocolate from the fork. Place chocolate on parchment to dry - about 2 hours. Remove and YUM!


A picture of the chocolate and the insides. The swirl when cut gives this striped look. You can do as many colours as you want!

Marry Christmas! Hope you like this one!

Linking up: Texas Monkey, the Girl Creative

post signature

Saturday, December 4, 2010

Quick Christmas

Okay, so again, rushed. Still, I really liked the Brownie Cookies that I made before, so I decided to try them again. Still ate half the dough though... Sigh. Anyway, I decided to post these present cookies that I made. The funny thing is that I only wanted them to be Red and Green... I think I could have done so much more with them. Oh well, live and learn.

I still like the recipe, and would still like to know if you'd tired it or what you thought. SOOO GOOD! But until then, I've got my tree stuff out, so I'm off to put it all up!


post signature

Friday, November 26, 2010

Chocolate Cupcake Cookies!

I'm super excited about these cookies. First of all, they taste stupidly good! I mean stupidly good because I was stupid enough to eat most of the raw dough. They taste like rich brownies... and they make adorable chocolate cupcake cookies! I made these cookies to honor a couple of hard working students - a celebration for hard work. Too bad they didn't get to eat them because of the snow day we had. I had to make another dessert for them instead (which I'll post later).


Chocolate? Okay, so you can't quite see the cookies behind the icing, but that's okay. I've been working hard to make the cupcake cookie look cute. I had a great idea when I made them, but I truly believe the strong colours were too much. I wish I had some pastel type of dye (rather than the Wilton kinds I have now). I need to order Americolor!

Chocolate? Check out this picture instead! OH :: drools :: cookie-licious!


Are you drooling yet? Well, I'll share the recipe with you. Seriously, give it a shot!

Chocolate Brownie Cookies:

1 tbsp instant coffee
1/2 c cocoa (good dark chocolate cocoa - almost forgot this part!Thanks Christie!)
1 tbsp warm water
1 cup butter or margarine
1 pinch salt
1 c sugar
1 lg egg
1 tsp vanilla
2 1/2 cup flour

Directions:

Oven to 325 degrees.

1. Dissolve coffee in water. Cream butter and sugar together. Add salt,egg, vanilla and coffee sludge :).

2. Mix cocoa into the mix and slowly add in the flour - mix until dough completely even in colour. Watch the bottom too!

3. Let dough chill for 1 hour, roll out onto floured surface, cut shapes (1 inch thick), then place on baking sheet. Chill the uncooked dough in the freezer for 3 minutes (to keep the shape crisp). Bake for 7-10 minutes or until cooked through. Place on wire wrack to cool, decorate.


Hope you are all having a great Thanksgiving weekend!

Christmas decorating this weekend :: rubs hand together ::

post signature