New blog design. I can't wait for spring any longer! It's too close. This cute little theme has been in the back of my head for a while now. I've been wanting to create something a little more shiny and bright. What else is shiny? Well....
Who likes Cupcakes?
How about a giant cupcake?
Like This One:
Who likes Cupcakes?
How about a giant cupcake?
Like This One:
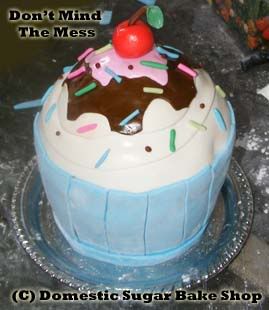
Well, I know I do! Would you like to learn how to make one? It is easier than you think. Carved cakes simply require a little bit of creativity... and a sharp knife!
What will you need:
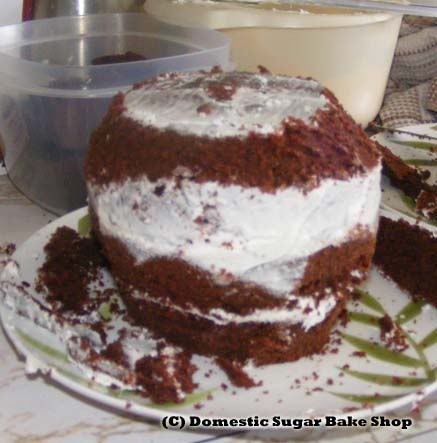
Cakes (at least three 6-inch or five 9-inch cakes) I used a 6" pan, so three cakes here.
Icing (whatever type you like).
Marshmallow Fondant
Americolor Gel color
Gumpaste decorations
Step One:
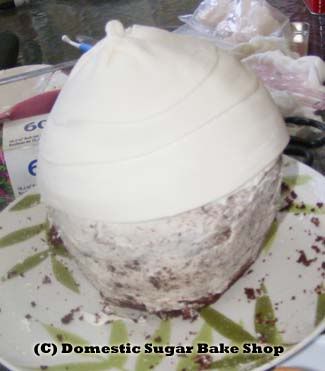
Stack your cakes and allow to settle. Once they have rested about 8 hours you can begin to cut them. I shaved the bottom inward and the top inward. You'll see the bulge in the middle making the cupcake shape. Be careful when cutting so as not to destroy the cake.
 Step 2:
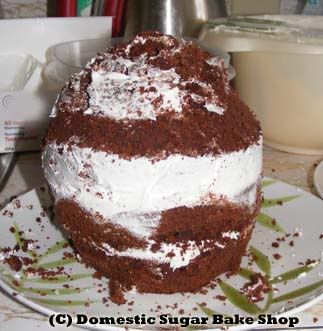
Using the cake carvings (the leftovers from shaping) add some height onto the top of the cake.
 Step 3:
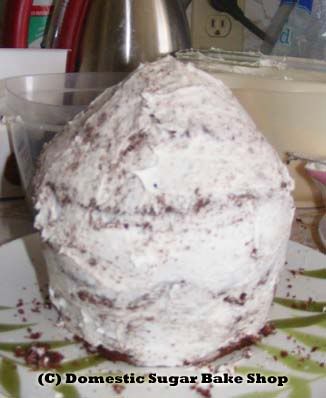
Dirty-ice the cake. Allow time to crust.
 Step 4:
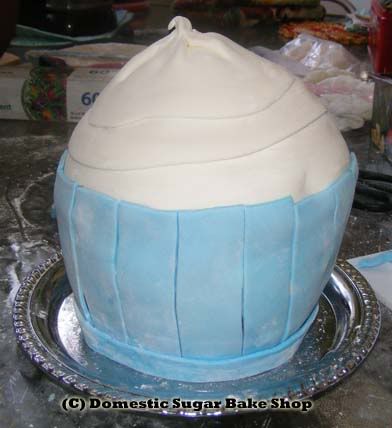
Once the cake has settled and the icing has crusted, apply another layer of icing. Now for the fondant. Using a flat band of fondant, wrap it around in a swirling pattern at the top of the cake. This will be the icing on the cupcake.
 Step 5:
Cut small strips of fondant (any color) to use as the wrapper. These rectangles give the cupcake a little more definition. Make sure to smooth the fondant with your smoothing tool.
 Step 6:
Cupcakes need toppings. I used a small bit of chocolate fondant, and a small bit of pink fondant to make a type of sauce for the top.
 Then, once that was placed on, I made jimmies and a cherry out of gum paste and let them dry.
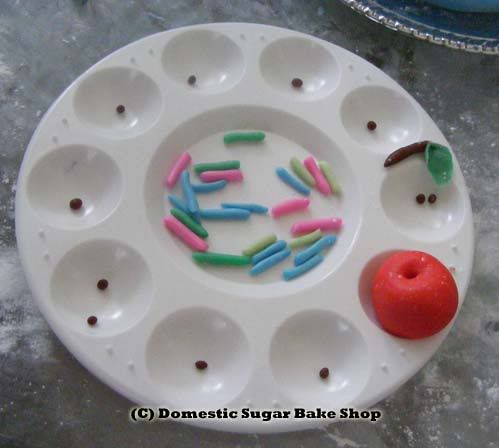
Apply each layer of with a little bit of water to hold down the item. This part is where you can get creative. It will depend on your own design. I like cherries. This looks like a delicious sundae!
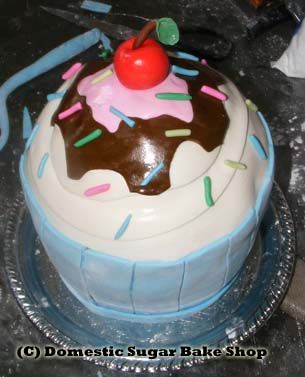 It's that simple!This cuppie is going to a friend of mine that gave up sugar. Maybe I can tempt her to the dark side >:)
Hope you enjoyed the tutorial!

17 comments:
Seriously AMAZING!! It is truly a piece of art, but I bet it tastes delicious:)
Great tutorial, I have never made a cupcake cake but I am looking forward for the opportunity to make one.
I can't wait to make a giant cupcake one day! Such a great looking cake, thanks for the tutorial.
I'm enjoying your new look page, very bright and shiny.
Wow, great job! I don't know if I'm brave enough to attempt something like this.
I'm hosting a weekly link up, Sweet Tooth Friday, and I'd love to have you share your recipe. http://alli-n-son.com/2011/03/10/vanilla-donuts/
ADORABLE! Great tutorial!
This is too cute. I recently did a Tangled Cake for my daughter.
I admire your creativity and your patience in building this cake. It looks like it would be delicious.
gosh that looks great
thanks for sharing the creative inspiration, am getting ready to host a cupcake themed party shortly and was undecided about what to do for it
This looks so cute. I am very impressed!
Wow, that looks so impressive, and like quite the cake. I think I may make one when I get the chance.
You make it look so easy!! I am in awe of your talent, lots of good stuff here. I invite you to link up any & all of your delightful creations to The Homespun Bake Shop @ The Tattered Tag. It's a great new place for delicious inspiration. Happy to be a new follower too. :)
Drop by The Tattered Tag
I LOVE this! Come on ova' and link up to WHASSUP!!! xoxokara
*ENTER LINKY PAR-TAY Here! *
Oh this cake is just delightful! Love it!
Hugs,
Olivia
This is so cute! I just love it. I am going to be featuring your in my recipes spotlight this coming Wednesday. Thanks for sharing your cute tutorial!
This is so adorable! Great job!!!
This is so absolutely adorable! Love it. Congratulations on being featured!
Hope you can come see me too!
Following you from http://willcookforsmiles.blogspot.com/
wow...this is simply adorable. I love that you showed us exactly how to do one.
Blessings,
Pamela
Post a Comment